Thursday, September 27, 2012

World Maker Faire 2012

We're about to make the journey to World Maker Faire.  As usual time has rushed by and grand plans of things to bring with us have distilled down to trying to complete one thing to bring.  Fortunately this year's Faire will include the Nerdy Derby, giving us a clear objective to shoot for.

But what to build?  There are some intimidating projects out there for the derby that I can't hope to match.  We could do LEGO, but with this season's FLL team in full swing we have our fill of brick building and engineering.  The girls and their Girl Scout troops have been doing a lot of art projects with duct tape...  Hmmm...


I started with a piece of perfboard cut to the length and width of a block from a pinewood derby kit.  A few wraps with duct tape and added the axles.

Then it was a matter of cutting and rolling lengths of tape, stacking them, taping them down, and repeating.  The entire (except the board base) is duct tape.  We used some appropriate, non-standard duct tape patterns for the finishing touches.

Unfortunately the car had a run-in with my smallest daughter.  Superglue was required to rebuild one wheel.  With one wobbly wheel it will probably not put in the fastest time, but I think it has a certain style.


Friday, August 3, 2012

So, for some reason I am really excited about the Curiosity/Mars Lab landing on Monday morning.  Remains to be seen if I will be excited enough to wake up at 1:30 a.m.

In the mean time, I've started re-reading Heinlen's "Stranger in a Strange Land".   I really wanted to read Ray Bradbury's "The Martian Chronicles", but that does not seem to be available for Kindle.

I thought about doing a marathon viewing of "Mars Attacks" on Sunday night, but I don't know if I could watch it that many times.   "War of the Worlds" could be in the playlist (the original movie version, not the Tom Cruise remake).  I'm not a huge fan of "Red Planet".  I could go see the "Total Recall" remake, or the original version with Arnold ("Consider this a divorce!").  I have not seen "John Carter".

What Mars movies would keep you awake until the results are in from the Olympic Mars Landing competition?

Wednesday, August 1, 2012

Passport to the Solar System?

So, just noticed the inside back cover of the U.S. passport.  It looks like a picture of Voyager, Earth, and the moon.

Just thought that is kinda cool.  The pages all have good images of American scenes, but this one makes it seem like we can keep going.

No Visa needed to visit Pluto anymore, they removed that requirement.


Sunday, June 3, 2012

Electrolysis rust removal

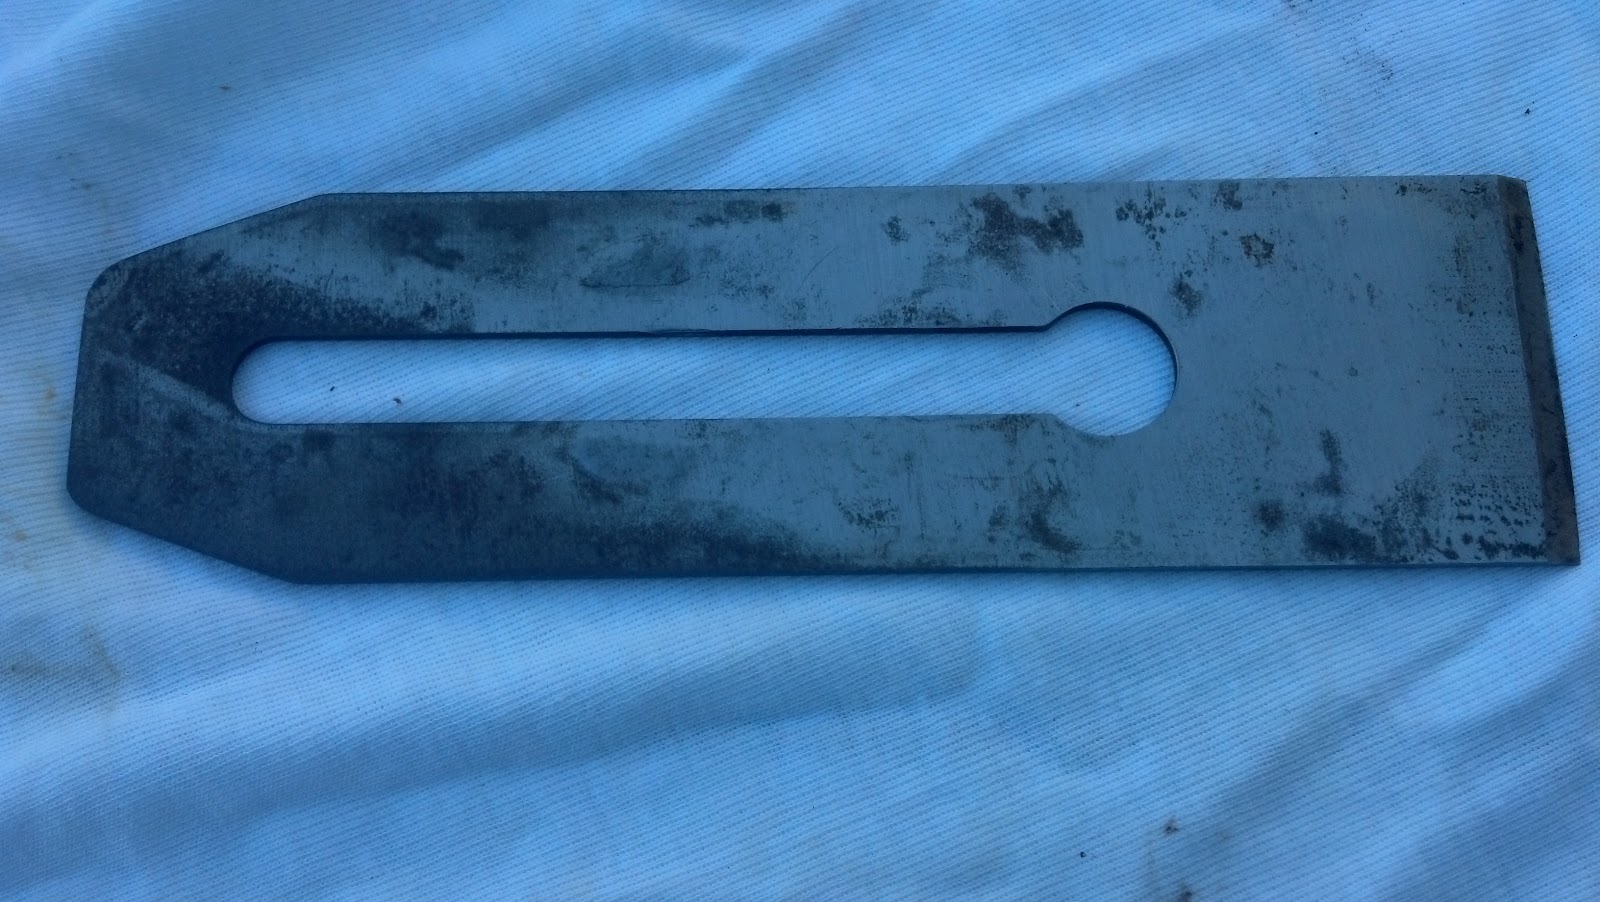
I took this hand plane from my Dad's garage. I think it belonged to my Grandfather, but I am not certain.


As you can see, it is a tad rusty, and the sole is covered in what looks like paint.

Once the plane is dismantled I see there are a bunch of parts that need some attention.

I've been reading various articles and wanting to try to use electrolysis to remove the rust.  Today the weather is beautiful, the kids have nothing on the schedule, and it seems I can spend the day taking care of this old tool. I've scanned a few instructions for performing this task, so this is more a report on how well it worked, rather than a how to.  For instructions you should check out the video on Woodworkers Guild of America, plus the detailed instructions, Mr. Vondriska does a nice job presenting the process, and has the idea of using a coffee can for the anode.  Instructions from Make: Magazine's project's blog by "Stan the Toolfool" and an article from Rick's Woodshop Creations.  After reading up on the process I was ready to get started.

Fortunately I have a neighbor who does a lot of car work and was willing to lend me his battery charger (thanks, Jeff), and a neighbor who has laundry soda (thanks Teri).  With leftover wire from the electromagnet experiment at the last science birthday party, a 6 gallon bucket, and an old coffee can we had laying around, I had everything I needed.

To make the anode I cut the coffee can in half to make two half cylinders.  I drilled 3 holes in each side and re-connected the pieces with wire.  I did this to give myself more room for the tools.  Since the plan is a No. 5 I had to use the 6 gallon bucket, plus this expanded anode, to make room.  That process probably took the longest, as I was using 14ga wire and wearing gloves so I didn't lacerate my hands on sharp can edges.  I also put a hole on either half at the top and wired up the leads there.


Checking the fit before filling with water/soad ash solution.
 
I first did the blade, half of which was covered in surface rust.  I mixed the soda ash in the water, put together all the pieces, and suspended the blade.

As soon as I fired up the charger I started seeing bubbles.  I wasn't getting 2 amps of current reading on the charger's ammeter, so I switched it up to the 6 setting.


After a while some sludge accumulated at the top.  I left the blade in for a couple hours.  I pulled it out a few times to check, it was pretty clear the process was working.
Mmmm, soup.

Sorry about my photography skills.  My worktable was now in the shade.  The black areas are where the rust was removed.
The body went in next. I was able to throttle the charger down to the 2 amp setting, maybe because this was a much bigger piece.  After a short while I took it out and was able to easily scrub off the paint from the sole, either because of the electrolysis or just from being soaked for a while.  This part seemed to get done very quickly, possibly the rust was only light on the surface.  After cleaning it up with a quick scrub I have a nice, black, rust-free piece of iron.  Wrapped up by running the chip breaker through the process.  I was going to do the frog too, but was worried about the adjustment knob being brass, and it is not in that bad of shape.

Everything got a light coat of machine oil.  The next phase is to sharpen the blade, chipbreaker, and lap the sole to flat.  I'm using a slab of marble with varying grits of sandpaper, I guess that is the "Scarysharp" method.  The sole looks good, with a few pits and scrapes that don't look too deep.  Hopefully it will only take a few hours of labor to straighten it up.

Monday, November 7, 2011

Jupiter Gazing

For the past few weeks I've noticed Jupiter hanging in the Eastern sky in the evenings from the front yard.  I keep telling myself that I'll get the old telescope out and see if it still works.  So, last night I actually did (in spite of the birthday party going on inside, 12 kids in the house is a good reason to hide in the yard.)  I have an old Meade Saturn reflector telescope, it's been sitting idle for years.  Found a few of the set screws are missing, and the equatorial mount is a bit loose, but I was able to put it together.

Brought it to the side yard between the houses, a bit shadowed from the porch lights of the neighborhood.  Very few stars are visible these days in the Northern Virginia area, lots of light pollution combined with the hazy sky.  I didn't bother aligning the equatorial mount for the scope, and the spotting scope is off kilter (that's where the set screws are missing).  First I did some views of the Moon, trying to capture the edge where you can see some terrain relief.  I could play for hours viewing the Moon, something about it is fascinating, probably because I read too much Heinlein.  The twins braved the chilly evening to see what was going on and seemed to think it was cool.

I spent some time finding Jupiter, which would have been easier if I had bothered to set up the telescope correctly; also had to play around to remember which eyepiece to use when scanning.  When I finally found it and saw 4 of the moons lined up next to it I was unexpectedly excited.  I was able to get all of the kids to parade through and take a look through the eyepiece, which went well as long as they followed the rule for "no touching the telescope while looking through" (had to re-find Jupiter once.)

A couple of the kids said they could make out banding on the planet.  I figured that was just artifacts from the telescope being dirty or something, but later I looked again and I agree, I think we could actually make out some banding.  Without the equatorial mount set up right the planet would zoom across the view at higher magnification, so fixing the alignment would make it easier to keep in view and get some more detail.

So, has the stargazing bug bit me?  We'll see if I get the telescope out more often, fix the missing pieces, and figure out how to properly use it.  Anyone up for a star party this winter?

Saturday, October 29, 2011

Pumpkin Windows

A few years ago someone in the neighborhood had cool silhouette coverings for their windows - dead tree branches, a skeleton, maybe some other things.  They looked neat; either they were store-bought or the people at that house were much more talented than me.  We first did this a couple years ago, thought I'd post about it this year.

I thought that would be a fun project.  I have a big roll of brown paper from some other project, I think I got it from the paint section at the hardware store.  Marker, scissors, and tape, measuring tape, and we are off and running.

  1. Measure the window and cut the paper to size, try to cover the entire window.  I just painted the living room a few weeks ago, so I cut the paper small enough to tape on the window, rather than the wall.
  2. Materials
  3. Draw Jack-o-lantern face
As creative as you want.
May need to spread out where there is room.


 4. Cut out the face, as if you were cutting out a pumpkin (without the pumpkin guts, but with more risk of paper cut.)


Proper technique for cutting the holes out.

5. Tape up to the windows for the whole neighborhood to see


In the past I have cut out squares of colored transparent film, like the stuff sold at craft stores to wrap up gift baskets.  Tape orange film over the openings, so from the outside the pumpkin glows orange. Or, cut out an alien and use green.


Thursday, September 15, 2011

Floating Glow Display

We made an attempt at building the Floating Glow Display described on Make: Projects.  This was a fun build; of course, I had to make it harder than it had to be. Our idea was to make "U.S.A." in red, white, and blue.

For some reason, a long time ago I had bought a sheet of acrylic/polycarbonate, so I used part of that for the sign. The Dremel Trio made carving into the plastic sheet fairly easy, although I find the dept adjustment on the Trio a little difficult to fine-tune.
Jessie finishing up the engraving.  She was a bit nervous about it at first, then I think she had fun.


Wired up 3 LEDs to a 9V battery, with some resistors in the loop to keep from blowing it out (tested the circuit on a breadboard first).  Not the neatest wiring job, but some heat shrink tubing hides some of my sloppy soldering.  

A bit of Shapelock for a stand and we're done, here's the finished product:
And, with the lights off and the battery plugged in:


The blue LED gets pretty washed out by the white, it actually looks more colorful in the picture than in reality. I will have to find a lower intensity white LED for this build.

Now I have made something that I can bring to Maker Faire in NYC this weekend.

Sunday, July 24, 2011

Settlers of Catan

Just spent a lovely afternoon playing Settlers of Catan with the twins.  The age on the box says 10 and up, but they (at 8) seemed to do OK.  I think it helped dust off some simple math skills that have atrophied over the summer.

Probably the best part of the time for them was the bartering.  They loved trying to trade resources.  Also, the fact that their older sisters are going to be jealous that they didn't get to learn to play first.  A little sibling rivalry is icing on the cake.

Overall I can see why this game is popular.  I can also see why buying the add on pack could make the game go longer.  We spent a good 3.5 hours playing, although we had a learning curve to get through.  We had removed all of the pieces from the holders a previous evening (which took some time), and our external ring of ocean is slightly wavy, so the hex pieces don't stay locked in.  A good playing surface would make things a lot more stable.

Thursday, June 30, 2011

DIY Lava Lamps

Oil, water, food coloring, and alka seltzer: Lava Lamps - Summer Fun -

Looks like a great idea to add to the science birthday party list.

Tuesday, June 28, 2011

LDRB Party Report

Time flies, it has already been a week since the party.  Seemed to be quite a success, I think the birthday girl and her friends enjoyed it.  Water bottle rockets, Estes rockets, and a trebuchet throwing water balloons.  Quite an eclectic collection of activities.  It was a hot and humid day, so I think any water activities were well received.

Some assembly required prior to beginning the seige
First they assembled some Art Applwhite qbit and pyramid rockets.  As they were doing this I was trying to set up the Estes launch pad, however my ancient launch controller wouldn't work.  While I have a nifty Pratt Hobbies Go-box controller I purchased from Apogee I didn't have a working battery pack to hook it up to, and the car was parked in the lot too far away to reach.  Fortunately a friend showed up to watch the party and I put him to work fixing the controller (thanks, Brett).

I had some of the girls assemble the trebuchet.  I think they enjoyed hitting things with the rubber mallet the most.


After some practice they were able to get some good distance out of the water balloons with the trebuchet.  I had initially tried some small balloons (sold as "water bombs"), but they were too fragile.  I used some full size balloons filled to the size of a softball with water.

            
Fire!

Target's Eye View
And yes, we all spent some time picking up balloon and string pieces from the field.

The water bottle rockets were a big hit, particularly the overhead launcher.  Here are some pics.
Party Favors!
Custom design takes flight
Splash up?
Once we got the Estes launch controller working we were able to do a few launches.

The Art Applewhite rockets flew surprisingly fast and high (A10-3T motor)!  The girls didn't do a great job gluing the tops (as the instructions stated), so the parachute charge blew through the top.  However, they had a great time with the first flight.  I will definitely use these again.
Launching a qBit
We also launched the Estes Oracle, and older model rocket that has a video camera in the nose.  Launched these on C motor.

Great shot of the Estes Oracle on launch


We launched Big Bertha and the BLU using B6-4 motors.  Both were good launches.  The kids enjoyed trying to catch the bomblets that came out of the BLU.

While I was picking up the motors from the hobby shop I impulse purchased an Estes ready-to-fly kit, the "Summit".   The rocket is surprisingly tall, given it comes in a box ready-to-fly.  The body is two equal length tubes, and it flew nicely.  If I had been more on top of things we would have set up to measure height of launch, but things were moving too quick for me to keep up.

Overall I received good reviews from the party.  A few technical glitches we were able to overcome.  The birthday girl seemed to enjoy herself, which is what it was all about, right? (no, not about me at all...)

Saturday, June 18, 2011

Launch Day!

Well, almost everything is done, and then some.  It is time to load the car up with all of the stuff.  I double-checked with the birthday girl last night, asking if she thinks I have gone overboard; fortunately she told me it was fine, then we started listening to some geek rock to make a playlist.  Thinking of some Consortium of Genius, Kirby Krakle, and some select nerdcore.  Trying to keep the explicit lyrics to a minimum; while they are 13 year olds I don't want to get into trouble (for that...).

If all goes well I'll post pics and hopefully some video.  If not, then I'll let you know which hospital to find me in.

Tuesday, June 14, 2011

This party needs to happen soon...

So, the more time I have the more I add to this party.  I may be able to get everything done by then.

The 10 launch pads are now cemented together.  Had some interesting times getting the tire stem valves in place.    Turns out the 2 inch long valves are actually narrower than the 1 inch valves.  So I had to drill a bigger hole for the shorter valves, which turned out to be too big for the valve to fit in by friction.  A little super glue solved that problem, should keep the valve against the end-cap until pressure builds to hold it there.
1-inch tire stem valve and end cap


Tire stem valve has a block on the end, so it won't fit into this end cap

Customizing the valve stem


This past weekend we had to go to the hardware store and pick up a couple connectors that we still needed.  While we were there I bought the parts to build a PVC trebuchet based on the design from John Park's episode on Make: Television.  Hope to use it to launch some water balloons across the field.

I also picked up some Estes rocket motors from the hobby shop today.  Hopefully I have enough time to prep for some of these to liven up the party.  Maybe the girls will enjoy building some saucer rockets using plans from Art Applewhite's site.  I'll also try to resurrect my old rockets from wherever they are buried in the garage.  I wonder if the Estes Oracle still works, that's the rocket with a video camera in the nose cone.

Tuesday, June 7, 2011

Science Theme Birthday Party

So, I had another request today for details of the science experiment birthday party.

Some background: last year we put together a bunch of science experiments for kids to do for at my 10 year old daughter's party.  I traversed a lot of Internet searches to find some fun stuff that would engage the kids, be fun to do, and not have a high chance of actually harming anyone.  As usual there a plenty of sources for info, such as Steve Spangler, Science Bob, and of course the fountain fun from Eepybird.  I also found some help from Instructables and I am sure there are some other places I found.

After seeing how fun this party looked, my 12 year old daughter decided she wanted the same party, so we ended up doing one around lunch time and one in the afternoon.  That worked out well.  Then, when the twins saw how much fun everyone had, they wanted a science birthday party for their 7th birthday!

We used caution tape in place of streamers, and the party was in the driveway (don't do this inside).  The streamers were fastened to the table and the canopy with, of course, duct tape.

For party favors the kids too home their electromagnets, the Mentos/Diet Coke tube, bubble wands, and safety goggles.  I also put all of these instructions in a little booklet for them to take home.  Each booklet included a warning statement:
Remember, DON'T try these unless you have an adult's permission and supervision!
Take appropriate safety precautions, including goggles and gloves!

So, do any of this at your own risk.  Take this as an opportunity to practice and teach safety to the kids, while letting them have some fun.


Salt Trees

We did this first, then put off to the side for the rest of the party, that way the crystals had time to start forming.  The first year we did it I used ammonia, but left that off the second year (figuring that a younger crowd shouldn't use ammonia).  The crystals did not form without the ammonia.  Leave it in and have adults help do that part.

Supplies

  • Piece of sponge or cardboard tube
  • Distilled water
  • Salt (iodine free pickling salt if available)
  • Laundry Bluing (find Mrs. Stewart's brand on-line.  I found it at Lehman's)
  • Ammonia (pure, not something mixed with cleaning)
  • Plastic cup and spoon
  • Plastic bowl
  • Liquid food coloring

Activity

  • Wear goggles and gloves and do this outside.  Ammonia puts out some fumes.
  • Put the piece of sponge or tube in the bowl
  • In the cup mix a couple spoons each of salt, ammonia, and bluing, add an equal amount of water
  • Pour the mixture over the sponge or the base of the tube, try to keep it off the sides of the bowl
  • Sprinkle 2 more spoonfuls of salt over the base
  • Add a few drops of food coloring in a couple spots
  • Let it sit, the crystals will grow as the liquid evaporates
  • Try adding small amounts of water at the bottom over the next few days

Source


Electromagnet

The kids were really into this, much more than I had thought they would be.

Supplies

  • Approximately 4 feet of insulated wire (14 gauge, 12 is too hard to bend in a coil)
  • D-cell battery
  • Iron nail or rod (if using a nail you may want to grind the point down to dull, prior to the part)
  • Something small and metal, like a paper clip or safety pin
  • Some electrical tape

Activity

  • Strip the insulation (plastic wrapping) from the ends of the wire so about 1/4“ of bare wire is showing (you may want to do this as a pre-party preparation)
  • Wrap the wire around the rod or nail in a tight coil, so it looks like a spring with the metal in the middle
  • Touch ends of the wire to opposite ends of the battery
  • Touch one end of the metal rod to the small metal item, it should pick it up!
  • Remove the wires from the battery, the metal will lose its magnetic power
  • We then taped the battery to the rod/coil, and one end of the wire was taped to a batter terminal.  That way the kids only had to move one end of the wire to make it work

Source

Not sure where I found this one, search around.


Air Cannon

I did the assembly of this prior to the party.  This came out at the end, when kids just wanted to goof around, since they had to take turns.

Supplies

  • Medium sized plastic trash can (that can be cut up)
  • Old shower curtain (that can be cut up too)
  • Bungee cord that can go around the wide mouth of the trash can

Activity

  • Lay the shower curtain flat and trace the wide part of the trash can
  • Now draw a rough circle around that one, making the new circle about 6 inches bigger
  • Cut out the big circle from the shower curtain
  • On the bottom of the trash can cut a hole in the center, 6 to 8 inches in diameter
  • Set the shower curtain on the large open end of the trash can, and secure it with the bungee cord
  • Point the small end of the can at the target, then tap the center of the shower curtain; it should blow a puff of air strong enough to knock over the paper cup
  • We filled the can with smoke from a fog machine so we could see the air moving.  Blows smoke rings, how cool!

Source

http://www.stevespanglerscience/experiment/00000076

Iodine Clock

This one is probably the hardest of the bunch.  We had all kinds of interesting results, not all successful.  Again, the kids really got into this one.

Supplies

  • Wear gloves and goggles and work outside – iodine will stain
  • 3 small clear plastic cups – label them A, B, and C with a marker
  • 1000mg Vitamin C tablet
  • 5 ml tincture of iodine (buy at a pharmacy - they limited how much we could buy at one time)
  • 15 ml hydrogen peroxide 3% (first aid supplies from the pharmacy)
  • 2.5 ml of liquid laundry starch (or ½ tsp of corn starch - we had better luck with corn starch)
  • Water

Activity

  • Wear gloves and goggles and work outside – iodine will stain
  • Mash up the vitamin c tablet (try putting it in a plastic bag and crushing with a spoon or rolling pin)
  • In cup A put the vitamin c and 60 ml warm water and stir
  • Pour 5 ml of liquid A into cup B
  • Add 60 ml of warm water and 5 ml of tincture of iodine to cup B
  • In cup C mix 10 ml of warm water, 15 ml of hydrogen peroxide, 2.5 ml of liquid starch
  • Pour all of cup B into cup C, then pour back to cup B, then back to cup C (to mix it up)
  • Set down cup C and watch.  Don't blink, you might miss it (may take a minute...)

Source

Ziplock Pop

Supplies

  • Take the ingredients outside – this should splash
  • 1 qt size zipper closed freezer bags(sandwich bags are too weak for this experiment)
  • 1 cup vinegar
  • ½ cup warm water
  • 1 teaspoon baking soda
  • ½ of a tissue

Activity

  • Lay the tissue flat and pour the baking soda in the middle
  • Fold the tissue around the baking soda so it won't fall out
  • Add the water and vinegar to the bag
  • Drop the tissue with baking soda into the bag
  • Seal the zipper closure tightly and give the bag a few quick shakes
  • Put the bag down and have everyone step back to a safe distance

Source

From the book The Book of Potentially Catastrophic Science: 50 Experiments by Sean Connolly

Elephant Toothpaste

Wow, this was a major hit.  I had all of the kids prepare their mixtures, then dump the yeast in at the same time.  Foam covered the entire table.

Supplies

  • Do this experiment outside where you can easily clean up the mess
  • Empty 16oz. Soda bottle
  • ½ cup hydrogen peroxide.  (The stuff used for first aid will work, but the higher the concentration the more reaction, get 20-volume (6%) from a beauty supply store)
  • A few squirts of dish detergent 
  • A few drops of food coloring
  • 1 teaspoon yeast
  • 2 tablespoons warm water

Activity

  • Put on gloves and goggles, hydrogen peroxide can be dangerous
  • Pour the hydrogen peroxide into the bottle
  • Add the soap to the bottle
  • Add the food coloring to the bottle
  • Swirl the contents to mix
  • In the plastic cup mix the warm water and yeast, stir until the yeast is dissolved
  • Pour the yeast mixture into the bottle
  • If nothing happens right away, give the bottle another gentle swirl to mix

Source

Soda Fountain

Another hit.  Most of the kids had seen the video, but never had a chance to actually try this.

Supplies

  • Do this experiment outside – if all goes well it will be messy!
  • 2 liter bottle of diet cola (does not have to be Coke brand, get the cheapest diet soda you can find)
  • 4 or 5 Mentos brand mints
  • Mint dropping tube (ours are built from a bottle lid, PVC pipe, PVC cap, paper clip, string.  Check out this Instructable)

Activity

  • Remove the paperclip from the tube
  • Place mints into the tube
  • Re-insert the paperclip through the small holes, should hold the mints in the tube
  • Open the bottle of diet cola
  • Attach the tube to the top of the bottle, be careful the mints don't drop out!
  • Stand back and pull the string so the mints drop into the bottle

Source

Giant Bubbles

I set this out after all the experiments were complete, and cake had been consumed.  They kept making bubbles until we ran out (impressive since I mixed about 4 gallons of bubble juice)

Supplies

  • Container that has a large mouth and holds more than 1 gallon
  • 2/3 cup dish washing liquid (such as Joy) (actually, use more, I ended up using about 2 cups)
  • 1 gallon water
  • 2 to 3 tablespoons of glycerin (get it from the pharmacy – or try using 2 teaspoons of sugar if you can't get glycerin)
  • Giant bubble wand (ours are made from 2 sticks with a loop of string duct taped to the ends.  Other folks have posted how to build these over on Instructables)

Activity

  • In the container gently mix the ingredients.  Don't stir too fast, bubble solution works best if it isn't foamy on top
  • Let the mix sit for a while, overnight if you can wait
  • Hold onto the ends of the sticks, dip the string into the solution
  • Raise the sticks and separate, waving through the air to make a bubble
  • Try to keep the solution from foaming too much while you blow bubbles

Source

http://bubbleblowers.com/homemade.html


Good luck with your endeavors, leave a comment to let me know how it goes for you!  Go Science!

Monday, May 30, 2011

Day 1 of assembley

We began launch pad assembly today with a trip to the local hardware store.  Our plan is to make 11 ground-level launch pads, and one overhead launch pad.  We had quite an interesting cart load of PVC fittings, with 44 end caps, 22 t-connectors, etc.  Unfortunately they did no have all of the female couplers, nor did they carry tire stem valves.  No project is complete without having to make multiple treks to the store.

Of 1/2 inch PVC we had plenty from a previous project where we built a kid's sprinkler.  We just had to plan our cuts to avoid the holes I had drilled in the PVC to make the fountains. (we will revisit that project probably this summer with some lessons learned from this version)

So, cut list for one ground level launch pad:
In 1/2 inch PVC pipe cut:

  • 4 pcs 6" long (side legs)
  • 2 pcs 4" long (middle legs)
  • 1 pcs 1" long (bottom upright)
  • 1 pcs 17" long (main upright)
You will need the following connectors for 1/2" PVC:
  • 4 end caps
  • 3 t-connectors
  • 1 male coupling
  • 1 female coupling
  • PVC cement
The male/female threaded couplings are optional; I want to be able to break these down for easier transport.

When we get to the trigger portion you will need
  • 8 zip ties
  • duct tape
  • hose clamp (to fit the 1/2 inch PVC)
  • The center portion from a 2 liter bottle
  • String
  • A scrap piece of PVC for the string to go throug
Not sure exactly how much all of this would cost, as I have a few of these laying around (particularly the 1/2 inch pipe).  Looking at my receipt:
  • 1/2" end caps: 4 @ $0.26
  • 1/2" tee: 3 @ $0.30
  • 1/2" Female adaptor: 1 @ $0.44
  • 1/2" Male adaptor: 1 @ $0.31
  • Hose clamp: 1@ $1.05
So, that much is about 3 bucks.  Under $10 for the entire launch pad and I have party favors for the LDRB birthday party!

Here are some shots of construction:
Not precision cuts, due both to the fact that there are random holes in our re-used PVC, and that it is hot as heck out there!

The new batch is shorter than the Mark 1 launcher we built as proof of concept.


Sunday, May 29, 2011

LDRBs

29 May 2011

This past Christmas one of the kids received this book: Soda Pop Rockets.  After reading it and doing some experiments I found that the clothes hangar launcher method described in the book just did not work well, at least in the rock hard clay soil of our area.  I was also able to get some used inner tubes from a local bike store (free!), but still had problems with reliable launching.

In the mean time, my eldest asked if she could have a rocket birthday party.  When a young lady asks to have a rocket birthday for her 13th, how could I say no?  However, we had to solve the launcher issue.  Thank goodness for the Internet and helpful people like Slater Harrison who has some wonderful instructions on his web site, sciencetoymaker.org.  His method of heating and bending PVC, along with the launch release described there, is nothing short of genius.

I have successfully implemented my Mark 1 launch pad based on the picture he attributes to Tracy Bahr of Wisconsin.

We are able to reliably and repeatedly launch 2 liter bottles to an impressive height.

So, now we are on to the project of building 10 of these launchers.  These launchers will be the party favors the kids take home from the upcoming birthday party, or

Large Dangerous Rocket Bottles
Named, of course, after the show that was on the Science Channel, which was extremely popular at our house.  I'll try to post cut lists and pictures in the coming days.

So, let the countdown begin!  

Sunday, October 25, 2009

Tool Using Monkey

I had an English teacher in High School who once said "the only difference between humans and other animals is that humans are the only ones who will pay for sex".

He was a great teacher.

However, for this forum, we'll go with the use of tools as the major difference.  Sure, other species use tools to crack open a sea urchin, get termites out of a nest, or other food related projects.  However, we've taken tool use to an integral aspect of our being, from flint knives to mobile phones connected to global, ubiquitous networks of other members of the species.

This is not a blog about tools like hammers, screwdrivers, and fabricators (unless there is something really cool to discuss about them).  Rather is is about the tools we use to affect our environment and the projects we do with those tools.

As a person I'm interested in many different things.  Being a good husband/father, gardener, DIY handyman (which may be Do It Yourself or Destroy It Yourself, depending on how well things go), to LEGO robotics team coach.  Technology provides a near infinite collection of blank pages and the ways to fill them with content and share across the world.